The Monarch Pioneer which has been fully repaired, thanks to advice from John Lavery. The 'M' typebar has been replaced, so that, thanks to Mr Lavery, the Monarch has been saved from a dethroning and the fate of being dumped on the scrapheap. Instead, it has been restored to all its regal splendour. Mmmm ...
I got this lovely little Monarch Pioneer portable typewriter from the US, knowing full well the 'M' typeslug had snapped off. At the price for which it was being offered, I thought it a worthwhile investment - and told the seller I believed I could replace the typebar. He expressed doubts.Sure enough, when it arrived, it was pretty promptly put in the "I'll get back to that one day" department, along with a number of other typewriters. I didn't give much thought to it, but really didn't have any idea about how to put in a new typebar.
Above, the Monarch typebar with the 'M' typeslug snapped off. Below, the 'M' typebar from a spare parts old Remington portable.
Then happily, a fortnight ago, John Lavery turned up from Beaudesert in Queensland.
'Kingmaker': The Monarch's savior, John Lavery
He showed me how to do it. I didn't take down notes at the time, but using his advice, I tackled the project this morning, going by memory from what John had told me. Result? A complete and most satisfying success!
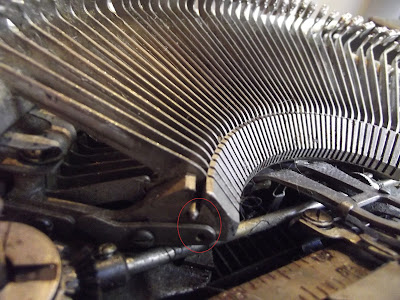
The rod which connects the typebars to the segment
Here is the Remington's connecting rod protruding from the left side of the segment. I have moved the carriage to the far right to give myself some leverage in sliding the rod out, to enable me to remove the 'M' typebar.
The big lesson: move the connecting rod VERY, VERY gently, just a very small fraction of a centimetre at a time, to ensure you don't pull it too far to the left when heading for the typebar to be replaced, or too far back to the right when reconnecting the typebars. In other words, move the rod in either direction no more than needed.
'A' shows the left end of the connecting rod before removal. 'B' is the screw on a bar which holds the connecting rod in place. It is necessary to loosen this screw and move the holding bar out of the way in order to move the connecting rod out.
Here is the right side of the Remington spare parts machine before the holding bar screw has been loosened and while the connecting rod is still in place. Below, the screw loosened and the bar moved.
A very steady hand on pillars at one end and very, very gentle tapping on the connecting rod at the other are recommended.
John was right that a lot of this is done by "feel". When moving the Monarch rod to the left, the typebars disconnected can be seen to fractionally "sink" as they slip off the levers below them. When reconnecting the typebars, hold the slug in your fingers and you can feel it being reconnected to the rod.


5 comments:
Oh, Brilliant!
Last time I was over at John's place, we almost did that to my SG1, but stopped, so I have yet to learn off him how to do it. But what can I say? That's magnificent that you have done it with such success.
Great work, Robert. That's a beautiful machine. To my novice eye it appears very similar in layout to a remington 3b. Would that be right?
Super repair action and thanks for showing it in such a detailed manner. Very nice machine, too.
It looks like there's no backspace key? How does that work?
Dear Janet. Please tell me you are playing a little joke?
Post a Comment